I noted these on Pinterest a while ago, when starting to think about Joel’s 2nd birthday and set myself the challenge of making one for him. Last year I made a giant cupcake which turned out well, and it amused me to think that he could have the current ‘trendy’ cake for two years in a row!!
There aren’t many blogs for UK versions and most recipes have the American quantities.
Anyway, this is how I made Joel’s rainbow cake. I made some errors along the way but it all turned out tasty and ok in the end!! Apologies in advance for such a long post!!
First I made a regular cake mix, with a 12, 12, 12, 6 ratio. So I beat 12oz butter with 12 ounces of caster sugar until creamy and fluffy.
It’s a lot of buter I know, but it’s a big cake and worth it!! I beat the butter first to soften it and make it suitable for adding the sugar.
I then added the sugar and kept beating with my electric whisk. (I made the cake at my Mum’s house and used her giant Christmas pudding mixing bowl)!
I then added the eggs one at a time and beat them in to loosen the mixture. It still seemed a bit thick for my liking, but I thought I’d keep going and see if I needed to think on my feet later on.
More mixing, mixing, mixing!! Until all 6 eggs are in….
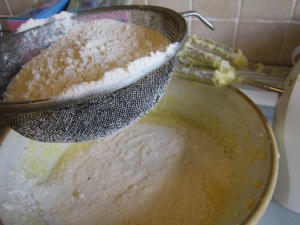
And I then sifted 12 oz self raising flour into the mix.
I love the freshly sifted pile of flour, it looks so soft!!
And more mixing mixing! You can see it still looks too thick, and I added a dollop of vanilla essence and some milk to add more moisture. It was still too thick though so I added another egg at this point and was finally happy with the consistency. I think the eggs weren’t large enough so 7 probably made more sense than 6 in this case.
Then came the fun part. I split my cake mix into 6 different tubs. My mum saves stork tubs and pudding tubs which made handy dishes for such a job.
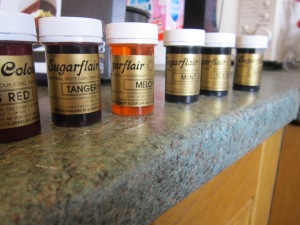
And here’s my gel colours all lined up and ready to go…. I bought them from Ebay after reading the recipe on this blog here ‘Kerry Cooks’:
And here’s my brightly coloured sponges all sorted. I probably wouldn’t use square tubs again to be honest!! They were awkward to get the sponge mix out of the corners!!
And this was my failing. I went to get the foil cake cases from Wilkos, which are normally 10 for £1, but they’d sold out!! My cake tins were too big to make a 6 layered cake with and I’d have had to make more cake mix than I had ingredients for (have I mentioned I hadn’t had a test of this cake and was going for it rather last minute?!) and my mum had small cake tins which would have given me a very tall but thin cake tower which wouldn’t have been easy to cut at all! So I bought these flan cakes instead (6 for £1) and thought I’d try to fold the sides up a bit instead. I thought it was risky, but they were size I wanted, and I was kicking myself for not being prepared and going to get the cases earlier. I think all of my town have got folk making rainbow cakes and snapping up the last suitable foil cases!!
Red and orange are cooking during this pic, but you can see the rest waiting to go in. Oh, and I cut a circle of grease proof paper to line the base of each case as well which really helped the cake come out. I also greased with some butter round the edge and base as well.
Whilst the cakes baked, I started on the cream cheese icing. Now, this was a bit silly of as well as I didn’t have the recipe to hand, so I threw in the remainder of my butter, a good 200g or so of cream cheese and just kept whisking more icing sugar in until I was happy with the consistency. If in this photo it looks lumpy and odd, that’s because it was 😦 The butter seemed to have loads of tiny petit pois size lumps in it. So I just kept whisking and whisking. It got ok in the end, but I also took to beating by hand with a wooden spoon and that seemed to help smooth it out as well. Not to mention build up a bicep that must be lop sided to my left arm now.
I’d decided to cover my cake in smarties, and bought a big pack, not realising they were mini smarties!! I seemed to be making my life a lot harder than it needed to be. Mum aso collects mini pudding tubs and I used these to sort through the colours so I could get the rainbow effect I wanted whilst the cakes cooled.
And heres the sponges. The flan cakes being bent up sort of worked, but it meant I didn’t have any true rounds!! They rose nicely, but stayed thinner at the edges. I was worried at this point about stacking them and filling in the gaps.
I was very impressed with the colours though. All lovely and bright.
But I set to work layering with my icing and coating, and this is the finished result. I ran out of icing after this point, and wondered whether to make more (not having the ingredients to hand) but with the gaps being quite full of icing as it was, didn’t want to overdo it, so added my smarties. On reflection, it wasn’t too much, and I would add another layer to hide the layers a bit better if I did it again.
I used the colours to sweep around the cake as above, I liked it and used 6 colours twice which worked out perfectly.
I left space on top for the ‘2’ candle and added two individual ones next to the ‘2’ of smarties and ta da. This is the finished result. It looked better on the day I made it, as having spent a night in the fridge (due to the cream cheese in the icing) the smarties all seemed to fade but it still looked ok the next day.
I’ll show off the finished result later on when I detail Joel’s birthday as we had a lovely day, but I have to get up and dressed now!!
EDIT – The Finished Cake and inside…


It looks wonderful! Love the effect of the smarties on the outside, a great idea. Can’t wait to see the inside!
LikeLike
Thank you! Your blog really helped put it all together! I just wish I’d got the right foil tins to get neater edges like yours!!
LikeLike
🙂 Next time! It’s so annoying when shops are out of stock of what you really need. The good thing about those tins is that you can wash and reuse them too!
LikeLike
Pingback: Stop what you’re doing and look at this! | Kerry Cooks
So bright coloured – those gel colours are fab. How much did you pop into each pot to get them so bright?
LikeLike
Probably too much to be honest!! I just used the handle of a teaspoon to dribble a bit into each cake mix and stirred until I was happy with the colour. I didn’t need to add any extra at all!!
LikeLike